Wednesday, November 28, 2012

Morning view 2


While waiting for the bus...

Tuesday, November 27, 2012

Burlap Placemat Tutorial from Zaaberry

 
Happy Tuesday, everyone! 
I'm pleased to have my good friend Ruby over from Zaaberry to share her Burlap Placemat Tutorial.  Just in time for the holidays, there are so many variations on this simple idea - go wild! 
 
 
Hi everyone, this is Ruby of Zaaberry.   I've been sewing off and on since I was a child, though my passion was really rekindled with the birth of my daughter.  These days, it has taken on a force of its own.  I love to sew pretty much anything and everything and probably, like most crafters, have a zillion projects going at once, only some of which get finished on time.  It's been so much fun following Roselee's Bias Tape Series each week.  I'm really flattered and excited to be included. The project I'm sharing today is a very simple way to dress up a table and definitely falls into the category of instant gratifcation.  Take a peek around at my other tutorials while you're visiting and let me know what you think. 
 
click on the photo to see the tutorial


Thursday, November 22, 2012

Tuesday, November 20, 2012

Fancy Dish Gloves from the Happier Homemaker


For this week's Bias Tape Tuesday installment, I wanted to share a project using single fold bias tape.  I stumbled across this tutorial and couldn't wait to try it - especially with the holidays coming - what a great hostess gift!  Useful and (my favorite) whimsical!


Single fold bias tape is what is pictured below.  It is frequently used for facing armholes in apparel.  I think I've seen it used to hem a skirt, too.  This is what you make when using the bias tape tool.  For the gloves, I simply used this single fold bias tape instead of ribbon.  Because you can make your own, you can pick whatever pattern matches your gloves and ruffle (I had this leftover green from a different project). 


Simply place the bias tape, opening side down, over seam and edgestitch.  I used the leftovers to make the little bows to cover up where the bias tape overlapped.


The only problem will be deciding who gets these!  They are too cute!  And, the fabric is from Heather Bailey's Nicey Jane collection - how could a Jane of All Trades resist? 
 
 Happy Thanksgiving!


Friday, November 16, 2012

Winner winner!


Thank you to all who entered the Mirabelle Messenger Bag pattern giveaway!  I loved reading all your ideas, and think I have a few more bags to make based on your creativity and vision!

Without further ado, our winner is....
...Christi, who said "I would love to try making this bag in one of the new laminated cotton fabrics that are out! This is so cute...."


Christi, please send me your email so I can send you the pattern!  Congratulations!
 
And, for those of you lovely readers who didn't win, you can still buy a copy of the pattern HERE and HERE.
Happy sewing!


Thanksgiving is for being thankful...

...and I love this idea for the family!  I think my little ones are just the right age to start this tradition.

 Click on the picture for the link to print your own.  Enjoy!

Wednesday, November 14, 2012

Living with Punks floor cushion - with homemade piping


With bias tape and now piping on the brain, I've been collecting ideas and projects perfect for utilizing both.  I loved this one from Living with Punks - a Land of Nod knock off floor cushion.   So...when I was in Joann's last weekend with 50% off their red tag, I couldn't pass up this faux cream leather and faux turquoise suede!


I opted for the fabric covered button accent to give it a bit more pop.


And altered the pattern a bit to include a side zipper.  MUCH easier to stuff and then close with a zipper (the tutorial has you handstitch closed - this material is a bit thick for handstitching).  On that note, I did really like the look of the handle, but was having a very hard time sewing with all the layers of piping and faux leather.  My "be kind to self" mantra kicked in and I threw the handle in the trash.  Oh well. 


I think the cushion was well-received despite the missing handle. 


What do you think?


Just a few more days to enter the Mirabelle Messenger Bag pattern GIVEAWAY!


Monday, November 12, 2012

Mirabelle Messenger Bag Pattern Giveaway!


I'm so excited to be hosting this very special giveaway.  It's my friend Ruby's first sewing pattern, and it's fantastic!  The Mirabelle Messenger Bag has everything in one bag - and the directions are easy-to-follow with lots of photos.  Great for an advanced beginner on up!


It is a great opportunity to practice your bias tape and piping- making talents, too. 


Ruby walks you clearly through how to insert a strap adjuster...


... magnetic snap...


...and interior zipper pocket.


It's the perfect place to hide a surprise for a little friend...


...and the perfect bag for a girl with places to go!


The best part about this bag is that it fits kids and adults, and you can use a variety of fabrics, from cute corduroy prints to more refined cotton prints.  Make your own bias tape and piping to coordinate with your fabric, and you'll have the cutest, most-versatile bag in town!

So...would you like to make one?  Even better, would you like to win the pattern for free?

Leave a comment telling who you think you'll make this for and what fabric you envision using.

Giveaway will be open until Friday, November 16th at 12 p.m. EST.

Good luck!


Tuesday, November 6, 2012

Make your own piping tutorial


For this week's Bias Tape Tuesday, I want to show you how easy it is to turn your homemade bias tape into piping.  Piping is such a great way to make your projects pop with a little extra detail - why not be able to use the perfect fabric?  And...there are lots of times you will want to use matching piping and bias tape (like the Retro Travel Bag).  Don't limit yourself to store-bought bias and piping!  Read on and learn to make your own!


Here's the perfect example of store-bought vs. homemade.

I pulled out this owl corduroy for a new project.  I put the store-bought bias tape up against it - the color is good, but the material doesn't match, it is a bit shiny, and the texture is flat.


Now, here's my homemade bias: textured corduroy, cute print with matching colors to accent owl print, and not shiny (I think the sheen looks weird with soft corduroy!).   MUCH better than the store-bought stuff.  But...this pattern calls for piping too, so, rather than sacrifice that cute bias, I'll just make my own piping with the polka dot corduroy.  Easy peasy.


Start by making bias strips (see tutorial here).  For how wide to make it, I looked this up.  The suggested formula was actually too small, so I had to remake.  For reference, my cording was 5/32".  I made the bias strip 1 1/2" wide.  This worked very well.

Once you make your strip, fold in half (no need to press) and place cording in fold.  Make sure to leave a bit of the cording sticking out. 


Hold the folded bias in one hand like a taco, and pin with the other.  Pin right up next to the cording to make it taut.  Continue folding, pinching and pinning all the way down.  (A little tip: make sure your pins follow the direction you plan to sew - makes it much easier to pull out!)


At each end, pin the cording to the fabric (it would stink to do all this work and then have the cording slip out!).


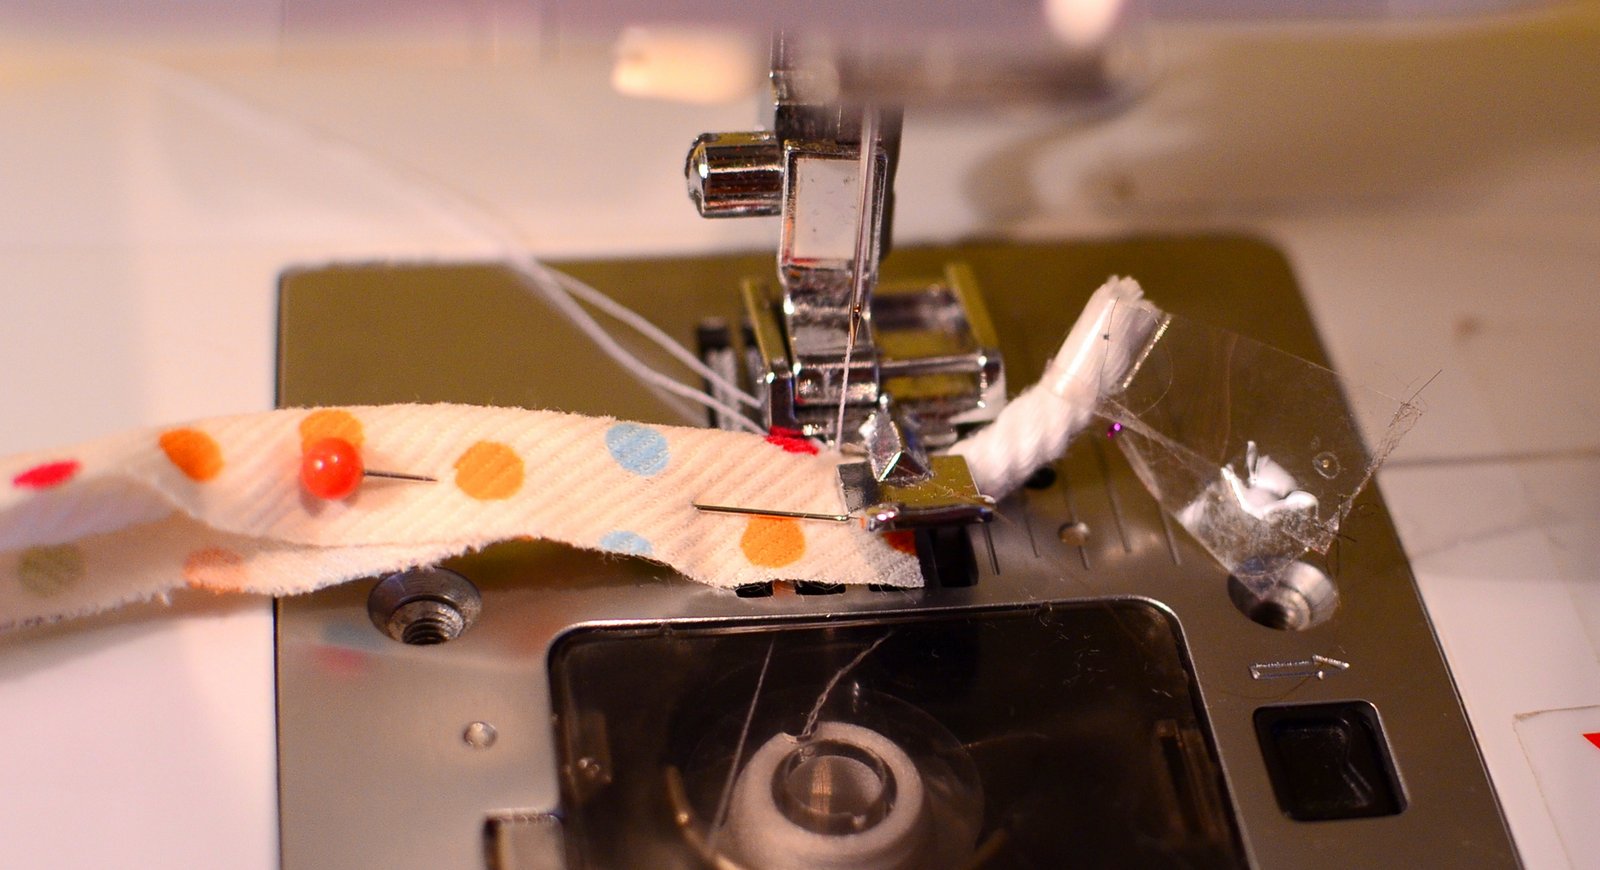
With your zipper foot, start by stitching across the end to secure the cording to the fabric. 


Then, turn and sew down the length of the piping, keeping your needle right up against the cording.  Make sure the raw edges match up - the more you pin, the easier this will be - the piping tends to roll a bit, making the raw edges come unmatched.


Stitch across the other end to secure and you are done!  Lovely, homemade piping perfectly matching your homemade bias.


Now, go use it in a cute new project!  (What could that be?  Stay tuned for more information and a giveaway!)


Thursday, November 1, 2012

Easy as Pie Tank from Made by Me & Shared with You


This week, for Bias Tape Tuesday (one day late), I'm pleased to have Tricia from Made By Me & Shared With You share her Easy As Pie Tank.  This is a great example of how bias tape can finish off a garment, and why making your own really is the way to go!

 
Hello Jane of All Trade readers. I'm Tricia of Made By Me. Shared With You, a little sewing blog that I write to keep my sane. You can find me posting anything sewing tips, to full tutorials, and an occasional free pattern. I love sewing for my kids, my home, and even myself. Please stop by, look around, and say hello. Thanks, Roselee, for having me.
 

Pop over to Tricia's blog to learn how to make this gorgeous shirt - a definite staple in my wardrobe!  While you're there, take some time to check out all her amazing tutorials!  My sewing list has increased exponentially after looking through them! 

LinkWithin

Related Posts Plugin for WordPress, Blogger...